Thursday, July 30, 2020

Small handbag inspired by the Paper Pixie!


For those who know what I like to craft, know that when it comes to small gift boxes, I adore everything Paper Pixie! Then if I need something a little bigger, I go to Mixed Up Craft for inspiration. This post is inspired by the Paper Pixie´s latest FB Live project. She is always live Wednesday evenings on the US East-coast, which is in the middle of the night when I am hopefully sound asleep, so I always watch the replay when I get up on Thursday morning. This morning was no different, and when I saw what she was going to make, I jumped right on the bandwagon!πŸ˜‚ Her projects are posted on her blog, and on YouTube on Fridays, but watching the replay I have the opportunity to pause and rewind, when ever I need to, and thus I am able to make her projects without having to wait for the YouTube tutorial.

 This handbag is made from one sheet of 8 1/2"x11" paper, if you choose to put the handle on it, you need an additional 6"x 3/4" strip. The patterned paper that is used to decorate the bag, comes out of a piece of 6"x6" paper, giving you some paper to spare.
Stamp a sentiment that you find fitting for the occasion, tie a ribbon around the handle and you are ready to go. I have also added two small embellishments on the handle trying to give the impression of the bag having metal studs.


I will be making more of these bags, for sure!πŸ‘


This would also be cool with animal prints pattern paper!


The bag closes under the lid, which makes it really sturdy, but that is in my opinion not really necessary. 
The bag is surprisingly roomy and you will be able to fit a variety of things in it!
Imagine this bag decorated with Christmas themed papers, and it will be perfect as alternative wrapping for small gifts and gift cards!

Wednesday, July 29, 2020

Penta-Cube Pop Up Box Card


Todays post is a card style that I swore I wouldn't do. Actually, I swore I wouldn't do it when it was a Triple-Cube Pop Up Box Card, however, then Sam Calcott from Mixed Up Craft did a FaceBook Craft-along doing the same card, only having five cubes instead of three, and since I wanted to craft-along with her, I had to try it out. The reason I wasn't going to make one of these cards, was that I can't really see who I should give it to, and for what occasion. 
It is actually a card that would work perfectly for any occasion, and I have chosen to make it into a friendship card, using Norwegian sentiments on it. 
It is a relatively easy card to make, it does, however, require cutting LOTS of mats and layers. Since I followed the live when I made this, I ended up gluing the whole thing together before adding my mats and layers, however, I would definitely recommend doing the decorating before putting it together, while everything is still flat.


Surprisingly, this card folds flat, and since it is a 5"x7" card, although a little bulky, it should be able to fit in a 5"x7" envelope. I have made a 5"x7 1/2" envelope to have a little more space. 


Mixed Up Crafts tutorial for the Penta-Cube Pop Up Box Card

Mixed Up Crafts tutorial for the Triple-Cube Pop Up Box Card


Sunday, July 26, 2020

Butterfly Kisses


Here is another card that is the result of my distress oxide ink session. This one has a totally different color scheme. This is also a "wrapped" card, though, this time I have used some cotton thread, that I used to incorporate in my jewelry making. I played around with the butterfly for quite some time before I decided to settle on a pearlescent vellum one attached to one that is cut out tracing the reverse of the actual butterfly die. I have then attached it on top of the cotton thread. The sentiment, Butterfly Kisses, is heat embossed with WOW Primary Purple Orchid, onto more of the same vellum. I have adhered a couple of small hearts next to the sentiment, and finished the card off with some small waterdrop-like crystals.


Summer Challenge


I´m in this private paper crafting group on FaceBook, and like so many other groups there are also monthly challenges there. This month, and in August, as well, there is a summer challenge going on. The  theme is "Wrapped". I am not usually making "wrapped" cards, although I sometimes add a ribbon or a bow to my cards, so I decided to do something totally out of my comfort zone and add burlap and twine to one of my cards.
First though, I created a background using some of my distress oxide sprays and water. Although these sprays are rather messy to work with, I had forgotten that they are so much fun!😁
To create the elements on the card,  I used my Scan´n Cut, copper penny heat embossing powder, a metallic marker and some glossy accents.


Thursday, July 23, 2020

A Spinning Walrus


I made this card a few weeks ago, trying to make a card that I had seen Sam Calcott do in one of her FB Lives. I had planned to make a Circus themed birthday card, and the card itself certainly is circus themed, but I kind of felt that I messed it up when I placed a walrus in the middle, as the spinning focal point. It doesn't even spin that wellπŸ˜‚. I realize I should have gone with one of the circus figures instead. Oh well, it is what it is, and I actually kind of like the card.


What is interesting about this card is that it has different pattern paper depending on which angle you view it from.
What I don't like to much about it, is that there is hardly any room to write or stamp your message on it.

It was a card I found a little hard to put together, as the die cut circles were kind of hard to line up. The narrow frames that are put on to hide the gaps had to be altered a bit to fit, as well.


The view from above is a good way to see how many angles there are to the card.


Tuesday, July 21, 2020

Second part of the Birthday Card Surprise!


  Birthday Set; Card, Box and Gift Card Envelope
In addition to the commissioned birthday card I shared yesterday, I also made a card to the same recipient from my boyfriend Geir and me. This time I chose to make a birthday set consisting of a Bouquet Envelope Box Card, a matching box and a Gift Card Envelope ( https://youtu.be/N9QQqq0lq1c)
    

The Bouquet Envelope Box Card is a card I have shared on this blog before, Envelope Box Bouquet Card, and it is as many of my cards inspired by Mixed Up Craft. Since I knew the recipient is a red and white roses kind of girls, I used Maja Design´s Summertime in the Garden - Garden Bouquet papers. I simply adore Maja Designs papers! 
 
Inside the card I used stamps from the Norwegian company Papirdesign (PD 1900274 Gratulerer and PD 1900154 Vin) 
I also attached the Gift Card Envelope on the inside with a small velcro dot.


The Gift Card Envelope is inspired by the Paper Pixie. It is a very quick and easy gift card envelope to make, so easy in fact, that I decided to make my own tutorial on how to make it.
The stamp on the front is from another Norwegian Stamp Company called Kort & Godt. Both the stampsets from Paperdesign and from Kort & Godt, have been purchased at the Norwegian based shop 


Inside the Gift Card Envelope I used another stamp from Paperdesign (PD 14921 NΓ₯r du blir gammel).

The Gift Card Envelope is decorated with the same Maja Design Papers as the Card. 


The box is a Flip Lid style box, adapted to fit the card. To decorate I have used more papers from Maja Design, this time "Summertime in the Garden - Smell the Roses. The stamp is from the same Paperdesign stamp set I used inside the card (PD 1900274 Gratulerer).


Monday, July 20, 2020

Birthday Surprise


The card closes with ribbon.

This Six Panel Folio Book Card inspired by Mixed Up Craft, is a birthday card commission I did for a neighbor. 
I used silver metallic card stock as the base, and alternately added red and white card stock on top. To make this card as simple as possible, I decorated the card base with small panels of silver, and topped these, again alternately, with red and white card stock to be written on. I then made tiny "bouquets" of small red and white roses and glued them on with hot-glue.
The front of the card was decorated with a small post card from the "Miss Margit - In the Garden Collection" from REPRINT, as well as another small bouquet of roses. Silver Nuvo Drops add the final touch.


The inside of the card with the box lying in front.


The only thing that shows that this is a birthday card is a small panel with a silver heat embossed "Happy Birthday" in Norwegian.
The same silver metallic card stock is used as the connection between the individual panels.


The card is rather thick when it is rolled together, and I had to make a fairly deep box to hold it. It is decorated in the same style as the card, with silver and red, and I have used the same postcard from REPRINT to decorate the closure flap of the box, as on the first panel of the card. The roses that I have added on the front, are a little bit bigger than the ones inside the card.


Friday, July 17, 2020

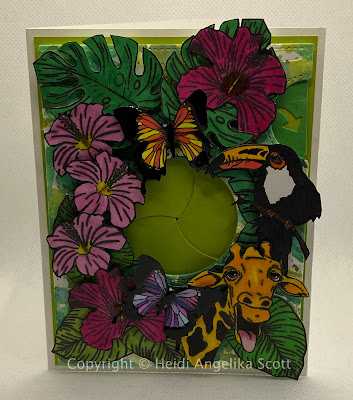
Tropical Magic Iris

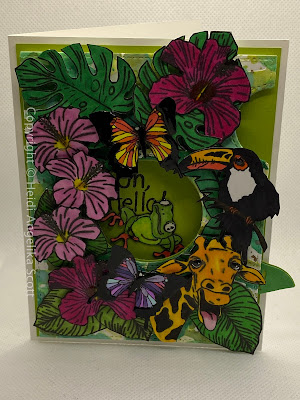
                                 Tropical themed Magic Iris Card


Everything tropical, seems to be what is hot in the crafting world these days. So I couldn't resist creating a tropical scene, when I finally brought out my Magic Iris dies from Lawn Fawn. 

On this card I started by embossing the distress oxide smooshed paper that I planned to create my scene on. Unfortunately not much of it can be seen on the finished card. Then I chose the images that I wanted to stamp and color, before starting a production line of stamping, coloring and fussy cutting every animal, flower and leaf, that I wanted to put on my card. Then I die cut the coverplate and started to place all the different images around the opening of where the mechanical part of the magic iris would be placed. I also decided what image I wanted to peek through when the magic iris was opened. 

The open Magic Iris

Since I think of bright and cheerful colors when I think of the tropics, I chose vibrant colors when coloring in my stamped images. I chose to use Copic Markers for my coloring work, both because I find them more vibrant than coloring pencils, (although I do feel like I give up some of the control I feel like I have using pencils, as supposed to markers), but also because I find that it is a lot quicker, and I didn't have the time to sit and color for hours. I finished the card off by putting on Glossy Accents on the eyes of the animals, the wings of the butterflies, and the center of the flowers.


Friday, July 10, 2020

This is SO exciting!


I have always wanted to purchase monthly paper crafting boxes, but as I live in Norway and these boxes have to be shipped here from abroad, I have never signed up to receive any. I have basically considered it to be a too great of a cost to justify signing up for any . 
Well, those of you who follow this blog, know how much I LOVE Sam Calcott and her blog and YouTube Channel Mixed Up Craft. You might also remember that I mentioned that she was given the chance to design and release her own brand of products a while back. Very exciting! And in late May I learned that she was going to be the designer of the Papercraft Society Box for July! Of course I signed up!

Today I received it! Yay! And what I have decided to do, is to make my own box reveal, right here on my blog! 
Here we go:


Thursday, July 9, 2020

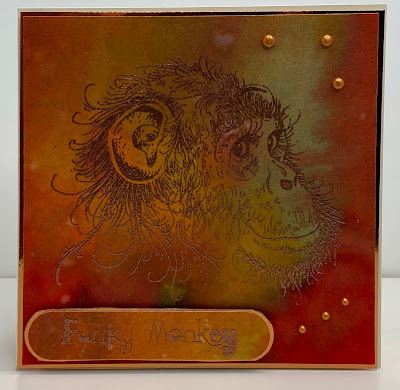
Funky Monkey


Heat Embossing on Distress Oxide Ink blended Backgrounds
Today's post is a result of me playing around with backgrounds and heat embossing. The backgrounds that I have used for all these cards, are made with various ways of using distress oxide inks. 
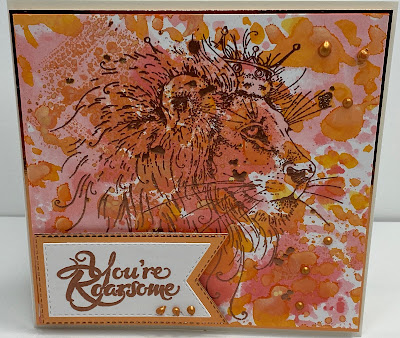
On the first card, "Funky Monkey", I have done ink blending. I did this one a while back, so I don't really remember which colors I used, but I remember that I was after a fall-leaves colored look. When I was happy with it, I spritzed it with some water mixed with Perfect Pearls, Perfect Pearl Mist, which I have mixed myself, adding water to the shimmery Perfect Pearl powder. 
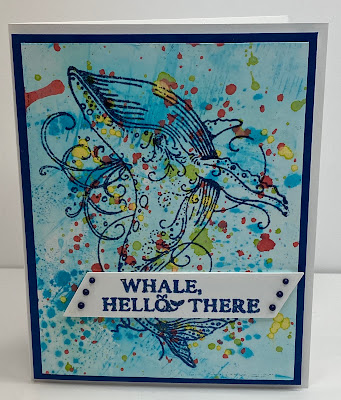
I have a collection of these really beautiful animal stamps, and I have used three of these animals in these cards. I stamped all three on the backgrounds with Versamark Ink, and then I heat embossed them. The monkey and the lion are heat embossed with Copper Penny heat embossing powder from Martha Stewart, and on the whale I have used Vintage Royal Blue embossing tinsel from Stampendous!.
Heat Embossing on Distress Oxide Smushed Backgrounds
On the other two cards, the whale and the lion, I have done distress oxide "smushing". Smushing is when you rub your ink pad onto a surface like for instant a glass media mat, or something that the ink doesn't attach to, so that it will transfer easily onto your card stock. Then you can either spray the ink with water, or just smush/rub your card stock into the ink on your work surface. That is what I did, I first smushed my paper in the ink with no water added, and then afterwards I diluted the ink with water and went back and smushed again. It is important to remember to dry the paper in between each "smushing", otherwise you will most likely end up with a big muddy mess. To finish these two backgrounds up, I dipped a painting brush in some water-diluted ink and tapped it to get a drop effect on the surface. Last, but not least, I used some matching Nuvo Drops to add a little extra to the cards.πŸ˜‚

Heat Embossing on Distress Oxide Smushed Background
I just love the effect of the copper penny embossing powder on the monkey and the lion card, and so far heat embossing is the method of using these stamps that is my favorite! I have tried to color them as well, however, as they have no clear defined borders, it is hard to know how to color them.


Friday, July 3, 2020

Making envelopes out of scraps, can lead to ideas for cards.


I very often use A3 sized sketch paper to make my envelopes. That means that I often have quite a few scraps left over. The scrap pieces of sketch paper aren't something I tend to grab when crafting cards, therefore it tends to accumulate over time. Yesterday I got the idea that I should make smaller envelopes out of the scraps, but since I didn't want to have a bunch of small envelopes lying around, I decided to make smaller cards to go with them. Since I like the idea of having thank you cards available should I need them, I went with that idea and cut down some pre-scored cards to 5"x3 1/4". I then started die cutting elements that I wanted to be on the cards, and since I wanted to make a set of cards, I chose to use a different color on each of the cards. I did six cards in total. Since I am here in Norway, I decided to keep the sentiment in Norwegian. Therefore I simply called the card set "TAKK".


Easy Fold-Over Cards

Lately I have been hooked on making a simple fold-over card, that you can easily make into a gift card/tag-pocket card. Once again...