Saturday, April 24, 2021
Mixed media card
I had an extra stamped and die cut flower sitting on my desk after making the Tri-Fold Window Card the other day, and figured that I would use it as a topper on a mixed media background that I was making. I have been wanting to make a background using a stencil, some ink and glimmer paste for a while, and felt that mixing those would make a perfect background for a flower like the one I had left over from that other project.
I started by coloring the flower using watercolor brush pens, before chosing the color for the background. Since we have a "green" color challenge going in our FB group, I decided to go with a green background.
I chose a stencil that I liked, and used some Ranger Dye Ins to fill in parts of the cardfront through the stencil. I then went over some of the inked up parts with Nuvo Glimmer Paste, to create some extra dimension to parts of the cardfront. Holding the flower approximately where I wanted it to go, I thought the end result would be a bit too simple, so I decided to stamp some text in a different shade of green underneath where the flower would be placed. I then added some foam tape to the back of the flower before adding it to the cardfront. The card was finished off with some half-parls in two different shades of green.
A very simple, yet in my opinion, a great looking card.
Friday, April 23, 2021
Rain or Shine
Todays card is a simplified version of yesterday's Tri-Fold Window Card. I decided that I would make a regular top fold card, but instead of using two card bases to make one card, I decided that I could acheive the same "window look" by attaching a piece of die-cut-in-to card stock with the matching image stamped onto the card base underneath. If adhered on to the card base with foam tape, it would look like you were seeing the stamped image through a window.
This time I used a stencil to create a special effect on the front, and then I chose a coordinating stamp/die set that matched the stenciled background that I had made. I created a rainy day, and chose sentiments to match the "mood" of the card. I finished it off with some "bling", and in the end I had a card of encouragement.
Tri-Fold Window Card
Just a couple of quick and simple cards today, based on a Tri-Fold Window Card video I watched yesterday with Lisa Curcio from Lisa's Stamp Studio.
The reason for trying this style card out, was that I was in need of a fairly quick card to make, as I needed a Birthday Card for a crafting friend ASAP. As always when in need of ideas, I have a look on YouTube, and yesterday I came across this striking, however, fairly simple card.
It is a Tri-Fold, which means that it opens up first once:
then once more:
To make a card like this you will need two equal sized card bases. In one of them you are going to be creating the so-called window. This is done by first stamping the image on to the card front, before die cutting it out. It is really smart to use a stamping platform when doing this, as the the same image is also going to be stamped on the second card front. This time the card front will be facing the opposite way, that is, with the opening facing up. The second card base will eventually be glued inside the first card base, so that the stamped image can be seen through the window.
Lisa Curcio uses a beautiful coordinating floral stamp/die set from Stamping Up, and she didn't need to first stamp the outline of the image and then color it in, like I had to.
I colored the flower with Copic Markers, and decorated the top and the bottom of the card with some glitter paper and a silk ribbon. To finish the card off, I adhered some matching gemstones. Since it was supposed to be a Birthday card, I stamped suitable greetings inside the card.
Thursday, April 22, 2021
Double Gatefold Card, using Graphic 45 Fairy Wings Collection
I'm in this Facebook Card making group where one of the members is always sharing the most beautiful cards using various patterned paper collections. She is an expert at making cards that showcases the papers of her choice. One of the makers of pattern paper that she uses a lot is Graphic 45.
I have purchased some of their papers, but up until recently I haven't had any, but one, of their collections. However, after seeing all the beautiful cards that the group member have posted, I decided to try to get a hold of the Graphic 45 Collection called "Fairy Wings".
Unfortunately, when the collection arrived, I was stomped for ideas of what card to make. I watched loads of tutorials on YouTube before I decided on making something as simple as a Double Gatefold Card. I find that a huge part of cardmaking is actually deciding on which card to make! Then the task of choosing which papers to use follows closely.
I started out by picking my main paper, and chose the colors of the mats to best accompany the papers of my choice. When I was in the process of assembling the card, I wasn't really sure that a double gatefold was the best card to show off the papers I had chosen, however, I couldn't change my mind that far into the card. so I stuck with it, and the result is at least something I can live with. Even though it didn't turn into showcasing the papers the way I had intended. I have a lot to learn;-)
Wednesday, April 21, 2021
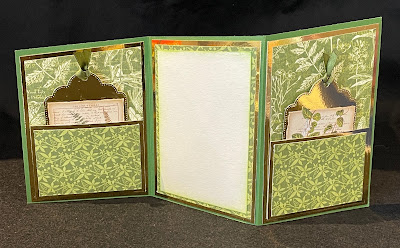
Lattice Fold, using Graphic 45's "Fairie Wings" collection
I have been looking at cards using the lattice fold technique for quite some time. Now and then tutorials pop up in my subscription list on YouTube, but until now I haven't found the corage to try it out. To do this card, I followed a tutorial by Sam Calcott of Mixed Up Craft, like I so often do when I think something looks quite hard. And once again she has provided a nice and easy-to-follow tutorial, for crafters, like myself, who worry that techniques will be too difficult to do. See the link to the tutorial below.
I wanted a card that would showcase more of the papers from Graphic 45's collection "Fairie Wings", and I chose this card because I would be able to at least use the papers on two sides of the card, the front, and the back. The stunning papers speak for themselves as well, so I wouldn't need to cover it up with bold sentiments or anything like that.
I could have decorated the inside with pattern paper as well, but I chose to put in a piece of white paper, on which to write the message/greeting for the recipient.
Book Fold Pop Out Card
I have had the base for a Book Fold Pop Out Card laying around for quite som time now, and I finally decided it was about time to finish it up by decorating it.
I had already made my mind up that the decoration needed to be a bunch of flowers, so I set out to produce plenty simple flowers. I have not taken the time to work on how to make striking flowers, so I have a lot to learn in that departement. However, my goal was't to have the most beautiful flowers, they just had to cover up the area I had in mind. I went with flowers in red, white, blue, yellow and purple, and stuck in a few green leaves here and there to complete the decoration.
I also decided on heat embossing the little Norwegian sayings I had chosen for the card, in white, in order for it to stand out on my red background. As I so often do, I chose to finish the card off with some Nuvo Drops, white this time.
Tuesday, April 20, 2021
Penny (not so much) Slider Rocker Card
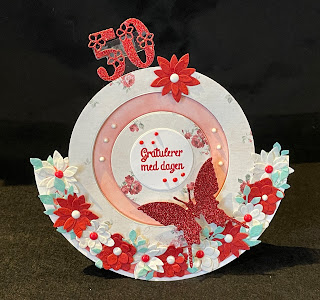
A while back I had to come up with a card for my sisters 50th Birthday, and it took me quite some time to decide which card to make. I had just seen a lot of penny slider cards, and when Sam Calcott of Mixed Up Craft shared her beautiful combination of a Penny Slider and a Rocker Card, I instantly knew that was the card I wanted to make.
I decided that I wanted clean bold colors, and went with red and white.
I started by making the slider part, and was really happy when it seemed to be working just fine. The slider spun around the the entire circle track without any problems. So I glued it onto the card base and started decorating. Unfortunately, I quickly found out that the butterfly that I wanted to be the visible part of the slider, was to heavy, and just like that, my fully functional slider was no longer sliding like it should. The butterfly remained in the lower part of the slider track, upside-down for the most part.
Dissapointed, but not defeated, I decided to glue it stuck where I thought it looked pretty.
I finished the card off with red and white flowers, stuck on the number 50, and since the sliding track wasn't going to be used anylonger, I decorated it with some white Nuvo Drops.
Even though the finished result wasn't really what I intended, I was quite happy with the end result.
Here is the tutorial from Mixed Up Craft:
Subscribe to:
Posts (Atom)


