Saturday, February 29, 2020

First attempt at video-editing!


Mini Milk Cartons with Lids

Today's project turned into quite a project. I have for a long time now, wanted to have a go at making tutorials for my crafted items, be it a card or a box, just to use as sort of a craft-diary for myself.  I use a Mac, so I needed an editing program suitable for IOS. I have used iMovie a bit at work, but felt like it wouldn't quite do the trick for what I needed, so I looked into some other popular programs from Apple. A lot of people recommend the Final Cut Pro X, but since it costs quite a fortune, I didn't feel quite ready to invest all that money into something I might not even use because I couldn't get the hang of it. Luckily for me, Apple offers a 30 days free trial period, so I ended up downloading that. The result being that I have spent the better part of today trying to understand how to do the simplest things when it comes to editing videos I have shot with my iPhone. Even though I had some videos from before, I decided to record a new one, working on a new project. 
I have once again chosen something I have found on paperpixie.com This is the project she posted this week, and her tutorial looks like it was made by a pro compared to mine. Oh well, at least I was able to edit together a video at all😂, and I am not totally displeased with my first attempt, although I know there is lots of room for improvement!!
Here are the boxes that I made:
Green


Pink, love

Purple, love
The one I made in the tutorial

And here is the link to the attempt at a tutorial: https://youtu.be/TDluRvHSISk

Thursday, February 27, 2020

Using Coordinating stamp and die-sets

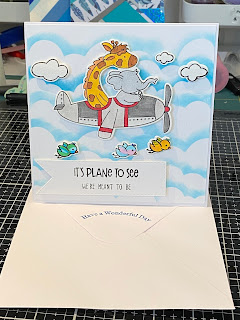
It's Plane to See
Todays card was actually made a couple of days ago, but I haven't really felt like posting the last few days....but here it is. I meant to create a fun-looking card, which was not too difficult with this coordinating stamp and die-set from aliexpress.com. I have several more sets like this one, so if I can get back into a creative mood, I should make some more fun cards.

I finished a totally different type of card just a little while ago, using the trial cut-outs of a set of new dies I just received (also from aliexpress.com). Sometimes when I receive dies I like to try out cutting them to see if they cut well, or whether or not I need to use an extra shim in my die-cut machine in order to get a nice result. These frame dies were quite intricate, so I suspected that I needed to use my metal shim to get a clean cut, which I did. I loved the color paper (Peacock from Lawn Fawn, lawnfawn.com) I had used so much, that I felt like creating a quick card utilizing the die-cuts I was left with after my trial run.
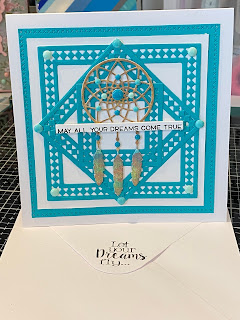
May All Your Dreams Come True
Since I have a fascination with dreamcatchers, and I thought the pattern on my frame die-cuts fit well with an Indian theme, I die-cut three dreamcatchers that I then glued on top of each other for dimension. I used Distressed Oxide Inks (brushed corduroy, peacock feathers, abandoned coral and squeezed lemonade) and applied them to the dreamcatcher with my ink-daubers. I used gumdrops in matching colors and placed them on the dreamcatcher as well as on the frame part of my card front. I finished the card by gluing the focal part of the card front onto a mat, also cut from Lawn Fawn´s Peacock paper. Last but not least, I stamped a sentiment, also from lawnfawn.com - from the Dandy Day coordinating stamp and die set from their newest release, onto some scrap pieces of paper, created dimension by adhering it onto the card with some foam-tape. After a rather long process of trying to decide where to put it, I ended up placing it in the middle of the card.


Monday, February 24, 2020

Kids Birthday card

Birthday card for a 3 year-old.
Yesterday my boyfriend and I had a family kid-birthday to go to, and even though my experience is that small kids never understand the thought behind card-giving, I had to make a card to bring. I don't know the child, a girl, very well, so I decided to go with a teddybear themed card, cause who doesn't like teddybears, right? I also chose a pink card base, as I know she likes pink. I created a sky and grass background by using dies and then I went with a new teddybear die that I just got. I was thinking it was a one-piece teddybear die, but it turned out that the bear came out in several pieces, which in a way was good, since I then could play a little with the colors of my bear. I wanted to show that it was a card for someones third birthday, so I incorporated a balloon that I glued the number three which I die-cut from glitter-foam. I then tied a string to the balloon and hid the knot with a small pink bow. I decided to stamp both the inside of the card and the envelope with birthday-bear stamps that I have.
The birthday-teddybear stamped inside the card.

Sunday, February 23, 2020

What's with the boxes?

A trio of Gift Boxes measuring 41/4"x3"x21/4"
With only one day back at making cards, I came across these really cute gift boxes on
paperpixie.com The Paper Pixie, Julie Dimatteo, originally designed them to hold two bars of a certain brand of soaps, however, they can be filled with whatever you want, as long as what you want to put into the box fits the dimensions of the box, 41/4"x3"x21/4".
Once again, Julie Dimatteo has made an excellent tutorial that is easy to follow:https://youtu.be/MOLiACMpdb4

I had a hard time stopping, and ended up making three boxes. I had lots of fun decorating them all in the end.
Purple and Grey Gift Box with a Bow

The Purple and Grey Gift Box seen from the side.

Pink and Grey Have a Magical Day Gift Box

The Have a Magical Day Gift Box filled with Snickers and Mars


Purple and Black/White Polka-dotted Gift Box

The Polka-dotted Gift Box seen from the side.


Thursday, February 20, 2020

Twist and Pop Card

Twist and Pop Card, Friendship, front
Today I thought I needed to do something other than making boxes, so I went back to making cards. This card was loads of fun to make and I find it to have somewhat of a wow-factor. It is a so-called Twist and Pop Card and there are loads of tutorials on how to make it online. Since I am following Sam Calcott´s blog mixedupcrafts.com, I used a tutorial that she has on her blog to learn how to make this type of card. I have linked the tutorial below. It is well worth having a look at both😊.
Twist and Pop Card, Friendship, inside
On the inside of the card I have stamped several friendship-themed sentiments and I have also put in panels to write messages on.


Wednesday, February 19, 2020

Impossible Gift Boxes


Impossible Gift Box, grey, rose gold and pink
I liked making the Impossible Popper Boxes so much that I decided to make another version of them as well, the Impossible Gift Box. These boxes only have one opening instead of two, and they measure 3" by 2" by 2". Like the Popper Box it can be filled with sweets, or if you like you can put a small candle inside it. 
Once again I got the idea from the Paper Pixie´s blog, paperpixie.com and she also has another wonderful youtube tutorial which shows how to make these cute little boxes in a real easy way! 
A picture comparison between the two boxes
                                             
I made 4 of the Impossible Gift Boxes while I was at it, and although I tried to vary the colors in all of them, I plan to fill them all with sweets, or goodies, and give them away, therefore I kept the text on all of them the same. The text, GOODIES ENJOY, is heat embossed on a white circle on all of them. I have also finished off the decoration with a small ribbon in matching colors.

Impossible Gift Box, black, silver and gold

Impossible Gift Box white, silver and blue

Impossible Gift Box, blues and white

Template to the Impossible Box 

Impossible Box filled with caramels....yum!!😋

Tuesday, February 18, 2020

Impossible Popper Boxes

Impossible Popper Box filled with caramels
I have recently fallen in love with these "Impossible Popper Boxes" that I came across at paperpixie.com Julie Dimatteo who has the Paper Pixie Blog also has an easy to follow tutorial on how to make this box on YouTube. https://youtu.be/Kg5bwKE28EA Following this tutorial makes a fancy looking box quite easy to make.

Impossible Popper Box, brown

I found it so much fun to make this box that I made three boxes in different colors. The boxes can for instance be filled with sweets to give out as small gifts at a party etc.

Impossible Popper Box, green

Impossible Popper Box, green, open at both ends


My hand drawn template for the scoring of the Impossible Popper Box

Impossible Popper Box, purple, closed

Impossible Popper Box, open

Impossible Popper Box, showing the opening of one end.
I will make more of these boxes for sure!!

Tuesday, February 11, 2020

Tri-Fold Shutter Card "hang-up".

Tri-Fold Shutter Card, For a Friend.

 I feel like I am getting the hang of the style of Triple-Fold Shutter Cards after producing four more cards the last couple of days.

With this I tried to create a masculine version of the card. I have simply called it "Love"

I have two sisters I am very grateful for, and I decided to make almost identical cards of appreciation for them. This one has a dark purple base.

While this one has a light purple base.

Check out The Paper Pixie´s tutorial on making one of these cards: https://youtu.be/651qgesTGoE

Monday, February 10, 2020

Mothers Day Card

The inside of my attempt at an Inter-lock Double Concertina Card.
Yesterday was Mother's Day here in Norway, and I decided to take a fancier approach to this years card for my mom. I decided to try to make an Inter-locked Double Concertina card that I chanced upon when looking for a new card-fold to try out. I got the idea from Sam Calcott´s Mixed Up Crafts blog, www.mixedupcraft.com She has TONS of awesome ideas for cards and other paper craft project on her site, and each project come with an easy to follow tutorial. Check it out!!
Back to my attempt at her beautiful card. I found the card to be quite intricate and not too easy at first, and I must admit that I had to discard my first attempt, and go with a smaller version than the one Sam shows in her tutorial. However, once I got all the measurements straight in my head (I am still getting used to thinking in inches and not centimeters😅), everything went a lot more smoothly. I think I need to work on getting better at cutting everything I need before I start assembling the actual cards, though. On this, I kind of chose colors and papers as I put it together. However, I am quite pleased with how the card turned out in the end! I even think, at least I hope my mom liked it.....😅!

The front of the card.
    
The card seen from above
Check out Sam Calcutt´s tutorial here: https://youtu.be/VYaOpu20TC4

Friday, February 7, 2020

Trying out a variety of card- folding techniques.

Tri-fold Shutter Card
Just to change things up a bit, I have started trying out a variety of different card-folding techniques lately. I will post the first one today. The card is called a "Tri-fold Shutter Card", and it was not too difficult as long as I followed the tutorial while I was crafting.

The front of the Triple-fold Shutter Card
I made the base of the card base from a pink card stock that I had in my paper stash. For the different panels I used patterned paper from the Bronté Charm 6x6" series. I chose to use stamps in Norwegian for this card, it is just a shame that I don't have very many.😔

The Tri-fold Shutter Card seen from above

The Tri-Fold Shutter Card seen from behind

To see the tutorial I followed to make this card, go to:
https://youtu.be/651qgesTGoE

Easy Fold-Over Cards

Lately I have been hooked on making a simple fold-over card, that you can easily make into a gift card/tag-pocket card. Once again...