The base for today´s post has been lying around since Christmas. I was searching for easy to do pop-up cards, when I came across a YouTube tutorial for a pop-up card that had EASY in the heading, while it at the same time looked really intricate and complicated. So, out of curiosity I had a peak at the beginning of the tutorial, and decided to make a trial-follow-along. I ended up making a sample version of the pop-up, in paper that was nice enough to make into a real card. A reoccuring problem for me, once I have made a base for a card, is that I more often than not, have no idea how to decorate the card bases I have made. This time was no different, so, the base has been on my desk ever since, just waiting to be used.😂 Almost two months went by before I had somewhat of an idea of how to decorate it. As it often is, ideas come to me when I am in bed, trying to fall asleep, and sometimes I don´t even remember the ideas the morning after.😳
I had just received an order of Lawn Fawn stamps and dies, and that reminded me of a coordinating stamp/die set I have had for a while called Dandy Day, and I thought it would be perfect to build a scene on my card with.
However, even with an idea I thought was good, I didn´t do anything about it for yet another week or so.
Finally, the other day I pulled out the stamp set, and started working on the card.
First I needed to build a background for my scene. The stamp set features, as the name promises, dandilions. In addition, it has several mice interacting with the dandilions, in particcular one mouse that comes gliding through the air, holding on to a dandilion. It was this stamp that gave me the idea of what kind of scene to build. So, I needed a sky/ground background in which the mouse could enter trough the air. I used stencils, also from Lawn Fawn, the slimline cloudy stencils, and the slimline grassy hillside stencils.
I am never really comfortable when inkblending grass and clouds, as I never am sure how it will turn out, and in this case I was inking up the actual pop-up base itself, and I was worried that I would ruin it. Luckily, the result was, in my eyes, passable, and I could start the actual stamping. I stamped more mice etc than I would need, and did some quick coloring with my Spectrum Noir Tri Blends before die cutting everything. After that, all that was left was building the scene😉, which for those who know me know is never "just"😂. I tend to overdo things, and never quite know when enough is enough. I am reasonably happy with the card itself, but went WAY overboard on the motif for the bellyband😂. Ah well, it is the card that is important!🤩
The YouTube tutorial I used was by Ann Melvin Positively Papercraft:
For this year´s Valentines I made a gift box and a card for my hubby. It started out as an Apron Style Gift Box that I had just watched a Mixed Up Craft YouTube tutorial on. However, as I was working on it,it changed from an apron holding several tools, to somewhat of a toolbox.
I am happy with the result, however, were I to start out with the intention of making a tool box, I would do it totally differently.
I decorated it with a bunch of tags calling my hubby lots of nice and charming things, and inside I put a jar of chocolate covered almonds. Maybe, if I am a nice girl, he will give me some, as well😘!
The card was made a few weeks ago, when I saw Mixed Up Craft share a card she herself had received for her 40th birthday, a so-called Book Flip Card. I chose to make it in blue, even though it is a Valentine´s Day Card.❤️💙❤️
As seen in the photos of the card with the box, I have personalized the bellyband a little more since taking the photos of the finished card.
As I was in the midst of making this card, one of my closest friends called to tell me that her mom had died the same day, so I ended up making another Book Flip Card, also in blue, but this time with the purpose of being a sympathy card.😢
Last week I was coming off a real card-making high. I had made several cards that I was really happy with, but all of a sudden I didn´t seem to have any ideas on cards to make anylonger. I found myself sitting at the desk in my craft room, just staring into space. I had as it is famously called among crafters, LOST MY MOJO🤣.
Luckily for me, my best crafting friend, Catelijne, called me on Messenger that same night to discuss a few crafting issues. When I mentioned that I was totally void of ideas on what to make next, she reminded me that I had just received a beautiful new stamp from Simon Says Stamp, in the US, that I just HAD TO HAVE, and that I ended up paying a small fortune for.😳
She gave me several ideas on how I could use it, and although I chose none of them, I actually managed to make a card with the stamp, as well as starting on yet two other backgrounds with the same stamp, that I can continue working on to make two more cards.
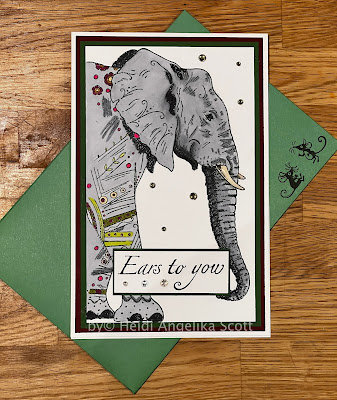
The stamp on the card that I finished, is colored with Spectrum Noir Tri-Blend Alcohol Markers.
The same week I had also received some, not quite as pricy stamps from AliExpress, and since I felt like was a bit on a "coloring roll", I decided to stamp these stamps and color some of them as well. The one below is colored with my Black Widow Coloring Pencils.
On the next two cards I have used my alcohol markers again.
It is important for me to mention though, that I am truly a beginner when it comes to coloring, be it with pencil or markers!
After coloring the images, I just matted them and adhered them to a card front, trying to use mats that matched the coloring that I had just done. Because the stamps are so varied in size, I ended up with a huge variation in card sizes, which meant having to make an array of different envelope sizes to fit!
I am often way behind with my blogging, as I often don´t prioritize finding time to sit down and spend the time it actually takes to write the posts, and I also often lack the inspiration to write blog posts. So the question is; why do I even have a blog? Especially since very few people stop by and have a look at what I post. I like, however, to have a way of documenting what I make. So that I can go back and search through old posts, and see what I have made. So I guess you could say that I write a blog for myself😂.
This post is a bit of a shout-out for one of my cards and myself😉. The card that I am showing in this post, was actually chosen to be one of the featured cards of the week on Craftworld a couple of weeks ago! Yoohoo!🎉 That has never happened to me before, so I am just a tiny bit proud!😂
I recently found a tutorial by Mixed Up Craft on how to make this fun fold style card called "Book Fold Cards". I actually think it originated in a weekly FaceBook live, before she posted it on YouTube. It is a fun card to make, and depending on how you decide to decorate it, you can use it for any occasion. I made two cards. The first one turned into a masculine Valentines Day Card, while with the second card I was aiming for a sympathy card, as I needed one for a very good friend of mine who just lost her mother.
The card measures only 2 3/4" x 8 1/4" when it is folded flat. I chose a belly-band to hold it closed, rather than the ribbon that Sam Calcott uses in her tutorial.
This is the sympathy card that I made. I chose to make it in a different shade of blue, and I used white to contrast the patterned paper and the blue.