Tuesday, May 26, 2020

Impossible Boxes


Impossible Horace😂
Meet Horace the Horse!😍 Sam Calcott from Mixed Up Craft, www.mixedupcraft.com, recently released her own collection of stamps, dies, papers and embossing folders, Made To Surprise. Sam's devoted crafting fans, and Sam herself, quickly made Horace the Horse and Geri the Giraffe their absolute favorites in the collection. They have also become mine.
Geri the Giraffe😁
So when I went to make another Impossible Box, the choice stood between Horace and Geri when it came to what to decorate the box with. This time the choice fell on Horace😉. But I have colored and die cut Geri as well, so he/she(?) will end up on something else in the near future!


The first time I used any of the stamps, were to decorate another Impossible Box. I have posted a variety of Impossible Boxes before, check out these previous blogposts: Impossible Gift Boxes and Impossible Popper Boxes, to see how it back then was the Paper Pixie from thepaperpixie.com who inspired me to make them.  

An Impossible Box and an Impossible Popper Box á la the Paper Pixie.
Sam Calcott had gotten many requests to share how to make an Impossible Box in a Facebook Live, and she finally did last week. She made very different sizes then the ones I had made before, so I was inspired to make yet another Impossible Box. Here is the tutorial she has posted on YouTube:


Double Flip Flap Card

Thank You
For all that you do and all that you are.
I am really behind on my blogging. I have been so busy setting up a new net site, that I haven't found much time to create, let alone blog. However, today I finally published my site, papercraftsbyheidiangelika.com, so now I can concentrate on doing other things. So, now I will try and catch up on updating my blog.

Today's post is a so-called Flip Flap Card. I guess I should write a tribute to Sam Calcott and her wonderful blog mixedupcraft.com, cause more often than not, she is the inspiration for my paper crafting. This card she did on a Live craft-along on Facebook last week, and I try to at least sit and watch and listen if I don't craft-along. This Live I crafted along to, though. I won't claim that I am able to follow her pace, but at least I finished the card not long after the Live. I had a few mishaps along the way, but I was able to cover them up so they won't be too noticeable to an untrained eye😂!


 I am fairly happy with the end result of this card, all I have to do now is make an envelope for it, and it is good to be sent out.


Usually after Sam has had a Live, she makes a youtube tutorial and a blogpost in which she shows an edited and much shorter version of how to make the item she made during the Live. Here is her YouTube video explaining how to make a flip flap Card:


Sunday, May 24, 2020

Det blir alltid sol etter regn.

Det blir alltid sol etter regn.
Todays card is a card inspired by Natasha Foote and her tutorial on the Ripped Paper Tutorial:

It is a very easy way yo make a card that only requires some ripped paper, inks, some sort of blending instrument and a stamp or two. And of course and idea of what you want your card to look like😉!

My card started out with the green grassy ground and the hills in the background and then when I messed up a bit on the sky...I tried to put in some sunlight that didn't work out at all, and I ended up having to go fairly heavy handed with the blue on top to cover up my mistake. Then when I went looking for a stamp to put in the foreground, I realized that I didn't have any trees in my collection. So I kept searching for an other alternative, and found the umbrella holding woman. Seeing that my sky looked like there was a storm coming, I changed my original idea, stamped the woman out to the side, colored her with Copic Markers, before I went back in with some more blue and added rain-like stripes to my sky, and voila, I had a story😂! I knew what kind of text I wanted to have on the side, but also knew that I didn't have a stamp that said what I wanted, so I went with "There will always be sun after rain", thinking that it would fit as well.
To finish off the card I used the same blue ink (Distress Oxide - Faded Jeans) and created a narrow border on the edges of the card base, before gluing my topper panel onto it. I also added some Nuvo Crystal Drops in Midnight Blue around the stamped sentiment.


Friday, May 15, 2020

Waterfall Card

Oh, Hello!
Today I am sharing a Waterfall Card, which is a fun interactive card that is really easy to make. What took me the longest with this card, was to decide what I wanted to stamp on the 6 different panels. I guess what I need to do when making a card like this is to land on a background paper first, then go for the stamped images and the rest of the colors. In my mind it looks the best if the six panels all combine to tell a story, and you might very well use actual photos instead of stamps or die cuts. Imagine the card as a birthday card with six different photos of the recipient of the card. That would be a fun birthday card to receive!
Inside the card. (stamped in Norwegian) 


Since it is an interactive card, there has to be a movement or an action happening. Here is a short movie showing this cards movement.

Check out Sam Calcott´s easy to follow youtube tutorial on how to make a waterfall card here:


or, visit her blog on mixedupcraft.com and look up her post on "Fun and very easy Waterfall Cards"!


Tuesday, May 12, 2020

Teepee Fold Card

Teepee Fold Card - Thank You
This card was really easy and fun to make. There are many tutorials on how to make it on YouTube, however I first made it crafting along with Sam Calcott of Mixed Up Craft (mixedupcraft.com) on her latest FB Live.
I kept up until it was time to make the rosette, which I have never made before. I struggled for quite some time before I figured out how to do it, although it is not really all that hard.

Seen from one of the sides

Seen from the other side.
Mixed Up Craft is probably working on shooting the tutorial video as we speak, so I can't share a link to that as of now, however, if you want to see the live craft-along you can check it out here:

Three Panel Pop Out Swing Card


You're cute as a Bug
This ladybug card is another result of a FB Live Craft along with Mixed Up Crafts Sam Calcott. mixedupcraft.com


I have made a couple of one panel versions of this card before, Pop Out Swing CardAnother Pop Out Swing Card.
The Pop Out Swing card is a fun and fairly easy card to make.


The open card


The back of the card.


Sam Calcotts YouTube video:


Heat embossing with fun foam stamps.

To the Moon and Back
This card is made using a fun technique in which you make your own stamps from fun foam. I have used different sizes stars and die cut out stars in different sizes. I then attached them to stamping blocks and stamped my stars with a VersaMark watermark stamp ink pad, before heat embossing them in gold. Then I watercolored them and made the finished card front into a card.

I got the idea from Natasha Foote, whom I follow on YouTube and who has a nice card making group on FB which I am a member of.


Tri fold Cards


Peeking through to say HI
I just wanted to share a couple of Tri Fold Cards that I have made recently. I have made this type of card before as well, however, then in a smaller size. Tri-Fold Shutter Card "hang-up".
I am part of a very creative and talented group of crafters on FaceBook, I have mentioned the brain behind the group in many of my blogposts before, Sam Calcott (mixedupcraft.com). She has this amazing FB group called  Mixed Up Craft and for a while now she has had live craft-alongs in her FB group, on which she recently made a Tri Fold Card. After the lives, she makes a youtube video showing how to make the project she has made in her live. (https://youtu.be/v7o-NJYhfE4)
She recently released her own brand at Craft Stash, a net based craft shop in the UK (craftstash.com), and one of her stamp characters in that release is the cutest giraffe that she calls Geri the Giraffe. I have ordered her collection, but it is yet to arrive. However, I knew I had a giraffe among my stamps, so I took it out to play😉. I spent a loooong time coloring the giraffe and all the leaves with coloring pencils, and I must admit I am pretty pleased with how it turned out. After all the coloring, it was time to fussy cut everything, as I only have the stamps and not a coordinating die set. Oh well, I got it done in the end.
View of the card open.
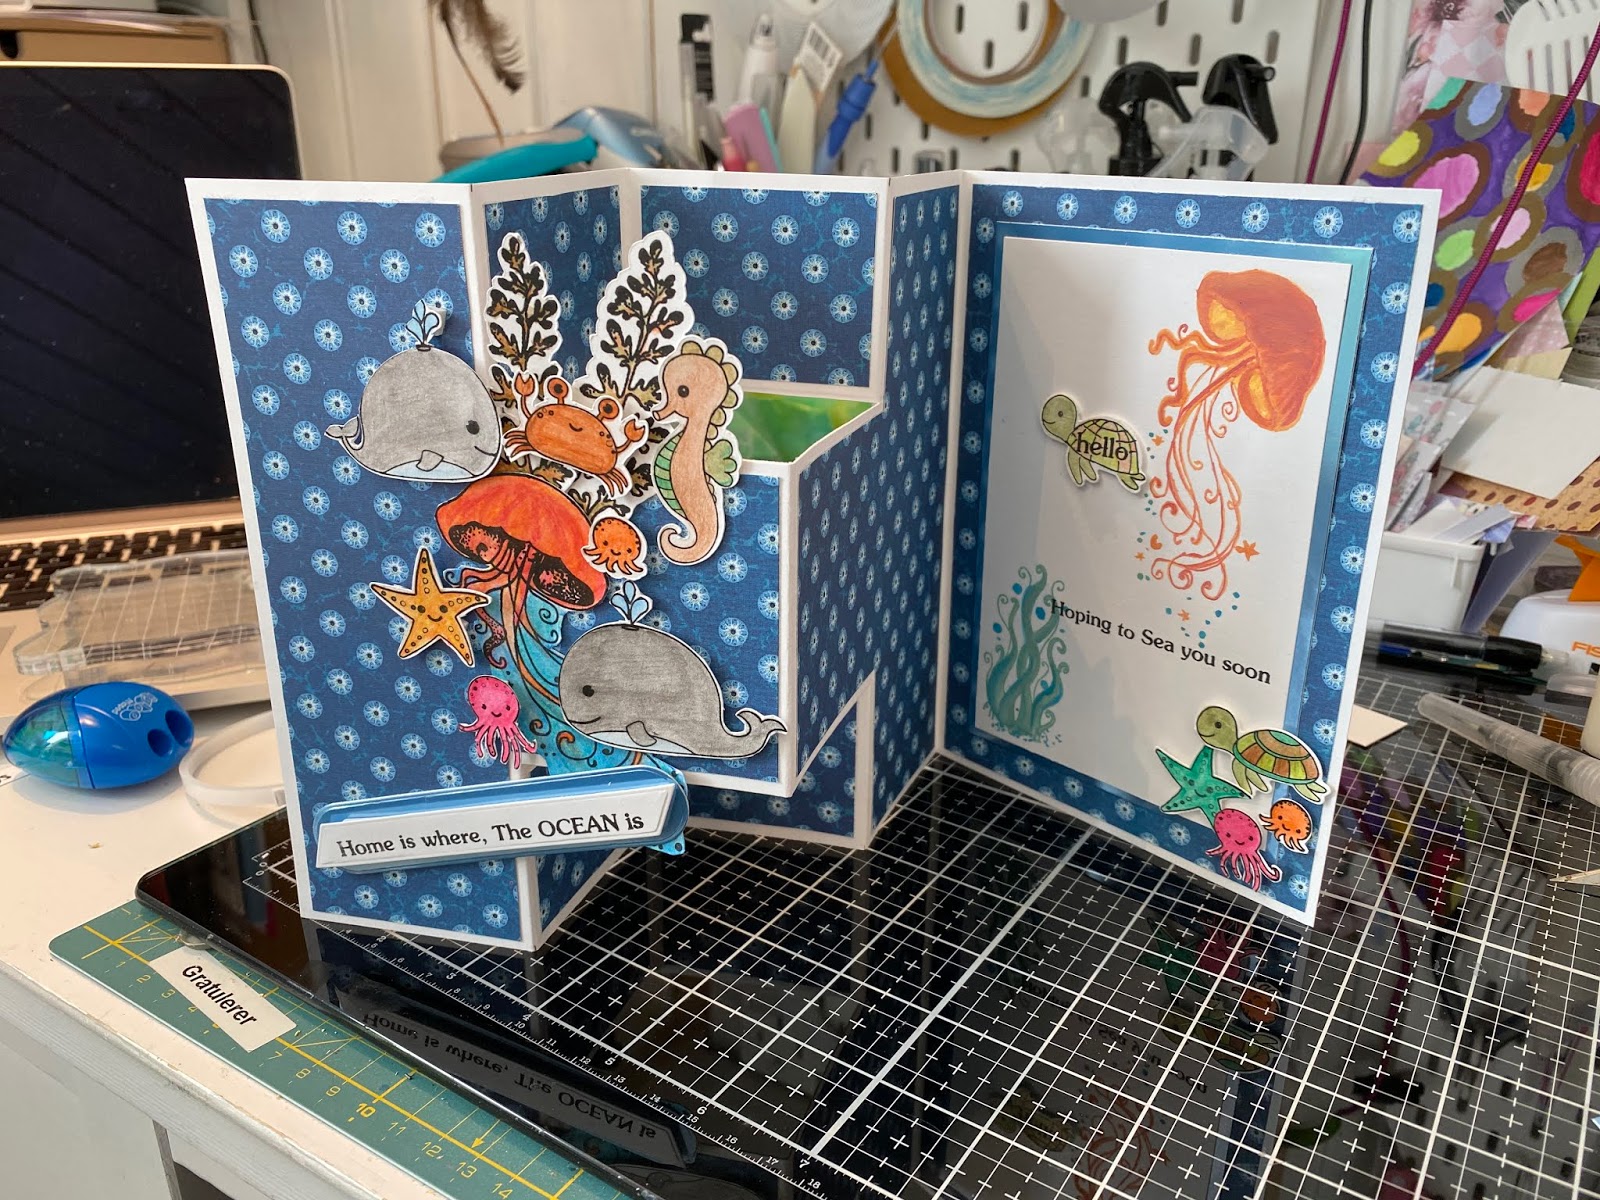
The other Tri Fold Card I made after watching Sam, actually the first one of the two, is an ocean teamed card that I call "Home is where the ocean is.
Home is where the OCEAN is.

The full view of the card
On this card I have also used coloring pencil colored stamped images, which I have built up to form an ocean scene.


I said YES!


Wiper Card for my boyfriend, now fiancé😉
 I haven't been posting for a few weeks now, NOT because I haven't made anything, but simply because I have not been motivated to do so. It seems to me, that the only one I am doing this for is myself. I have so few visits on my blog, that I might be better off just making something like a picture journal for myself. Oh, well......

Today's post is some happy news in these unstable Corona times. On Saturday my boyfriend, Geir, asked me to marry him!!🥰
                                       
The front panel
I said yes, of course, and on Sunday I decided to make him a card to show my love and appreciation. SO here it is. This is a so-called Wiper Card. When it is closed, all you can see is the front panel, but as soon as you pull on the sides, something pops into view. Kind of cool.
The back panel where you can stamp or write your message.
Once again I have used one of Sam Calcott´s from mixedupcraft.com cards as my inspiration. See how she makes a 6"x6" Wiper Card here:


Easy Fold-Over Cards

Lately I have been hooked on making a simple fold-over card, that you can easily make into a gift card/tag-pocket card. Once again...