A while ago, everyone in the Mixed Up Crafter group that I follow on Facebook had to have Craft Consortium Ltd´s collection called Circus. As a "have to have" kind of person, I also had to get a hold of at least some of the collection, and eventually I managed to get the pieces that I wanted. I have since purchased bits and pieces from a couple of other collections that Craft Consortium has released, and this Shadow Box Card is made mainly with papers from a collection called "At Home in the Wildflowers".
The shadow box card itself is once again inspired by Mixed Up Craft.
Since the card itself is a box, I made a separate box to put it in, instead of a regular envelope. And since it was intended for a friends 50th, I put decoupage paper inside the box, as a sort of padding.
My sister sent me a message a little while ago, asking me if I could make a birthday card for her grandson who was going to turn two. She told me his absolute favorite at the moment was "Flash McQueen" from the "Cars" movies. I had an idea for what type of card I wanted to make, but since I didn't have any "Cars" related papers, I had to search the internet to try and find some papers that I could use.
When Sam Calcott first shared her tutorial for this card, I was pretty certain that this was a card that I wouldn't make, because I couldn't see what occasion I would make this type of card for. However, when my sister gave me this task, it was the first type of card that came into my mind.
I downloaded loads of papers and I made sure to get some with the specific font that is used, as well.
I had lots of fun making this card, and I was very happy when my sister really liked the card.
Her grandsons birthday was yesterday, and according to my sister, he also was very pleased with it.😉
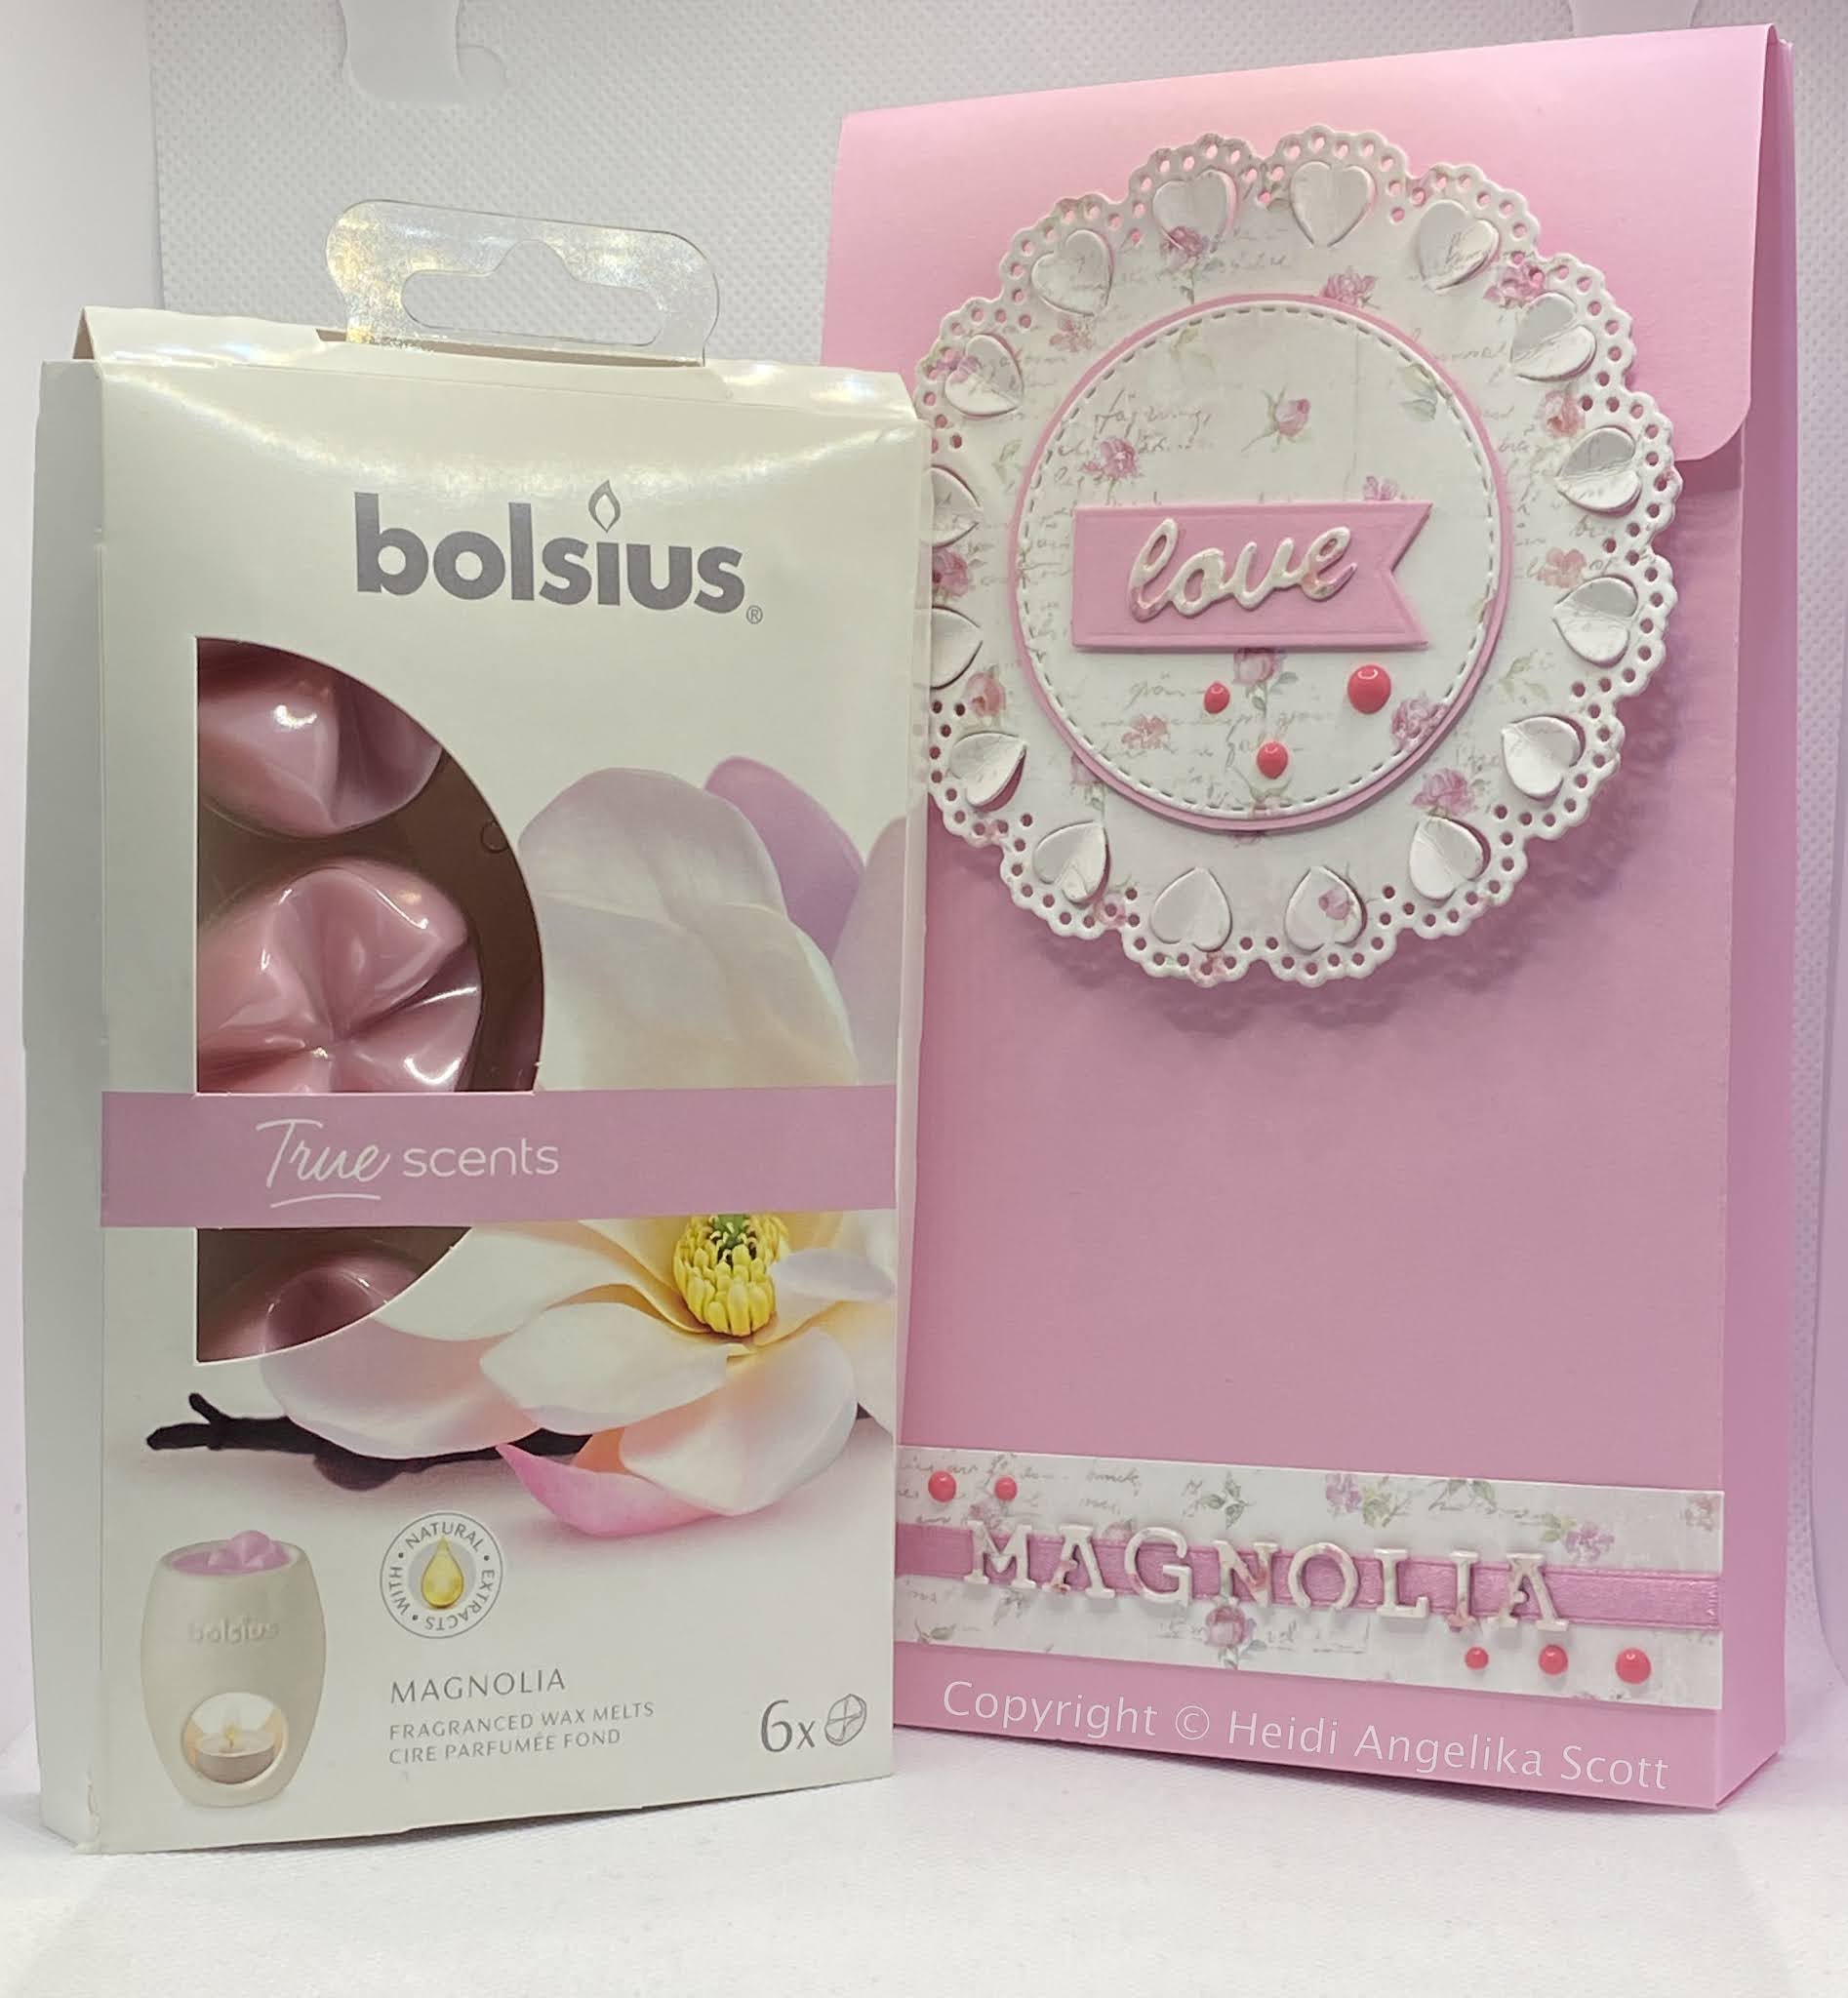
The other day I decided that I needed to expand my Love Box Series. I have several Bolsius products that I need to design gift boxes for, but I decided that it was time for the Bosius Wax Melts to get a gift box.
Normally when I make a box for my Love Box Series, I start from scratch and take all the measurements of the item that is going into the box, and design the box from those. This time, because the Wax Melts packaging has quite the odd shape, I decided that I would use a gift box/bag that I have already made, and just tweak the measurements to fit the Wax Melts. A while back, Mixed Up Craft had a Facebook Craft-a-long, where she showed how she had taken apart a box and tweaked it to her own needs. I decided to do the same. I took apart the bag in question and tweaked it to my own needs.😉
I started out making a box that had the right dimensions, but I wasn't happy with the papers that I had used, so therefore I started over. The result was the pink box below, that holds the Magnolia Wax Melts. The decorations on that box, set the standards of how I was going to decorate the other boxes, and I am quite happy with the way the boxes show the "trademark" style that I have set for the Love Box Series.
One thing I have changed up from the other boxes is that on these boxes you can actually see which fragrance you can expect on the inside of the box. On all three Wax Melts boxes I have diet out what fragrance is on the inside. Quite fiddly work, if I might say so, as the letters are quite small, and you need to stack and glue three of each together to create some dimension. I guess it is needless to say that I had glue all over my fingers by the time I was done. However, that doesn't matter, as I love the effect it has on the boxes.
The more products I make boxes for, the more I see the look of the Love Box Series evolve. Hopefully soon I will have landed on a look that is approximately the same for all the products.
I even shot a video of how I made one of the boxes, https://youtu.be/v1PIzl0A-Kw, it is made as a tutorial, I am, however, more aiming to show how I made these boxes.
I am not happy that it shows the image of a box for another Love Box Series box as a thumb nail, though, the Magnolia Fragrance Sticks Box. However, because I finished the video by showing some of the other Love Boxes, the last picture of the video is what is set as the video image. I am sure that there is a way to change it, but I am not YouTube sassy enough, to figure out how.
This is the discarded box, that I made first, and then partly because of the papers decided that I wouldn't use. I am sure I will find another use for it.
Todays card is a real quick and easy card called a split Gatefold Card. It is inspired by a YouTube tutorial by Jennifer McGuire. When I first started making card, she was my card making guru!
The card is really easy to make, however, it is still quite a striking type of card. The one I have made here is in portrait mode, and measures 5 1/2"x7". You can basically make these cards any size your card stock will allow you.
To make this card;
- I started out with a piece of card stock that was 5 1/2"x 8 1/2", and scored it on the 8 1/2" side at 2 1/8". I then turned it, and scored once more at 2 1/8".
- Next, I folded and burnished the two smaller panels in towards each other, so that they formed a "gate".
- To decorate the card, I stamped a piece of paper that was 5 1/4"x 6 3/4" with a background stamp, first with a light purple, and then with a vibrant green.
- Then I cut this piece of paper in the middle, to create two identical mats for the gates of my card. These were then glued onto the front of my card.
- I cut a strip of cilantro colored paper measuring 5 1/4"x 1 1/2" - cut it in two and glued it onto the front of my card. I also cut a thinner strip in light purple, Sugarplum, measuring 5 1/4"x 5/8", cut it in two, and glued it onto the first strip. Both strips were cut from Lawn Fawn paper scraps.
- On top of the paper strips I glued dark purple ribbon, leaving long enough ends unglued, so that they could be tied in a bow to close the card.
- I then die cut a large butterfly twice in white card stock, scored them in the middle and folded them in halves, before gluing each half onto the "gates" of the card, threading the loose ribbon through the butterfly.
- The last thing I did, as I thought the card needed something more, was to color the wings of the butterfly with a ZIG Wink of Stella brush pen in Glitter Violet, before tying the ribbon in a bow.
I wanted to make the inside of the card a bit different, so I decided to cut small slots to insert a loose piece of paper in to. I decided to keep the butterfly theme of the card, on the inside as well, hence I stamped it with a butterfly stamp, and colored them with my Black Widow Coloring Pencils.
This is Jennifer McGuire YouTube tutorial on how to make split Gatefold Cards.
The other day I posted a handbag/clutch style gift box that I had made after having watched a replay of a Paper Pixie Facebook Live. I love this bag a lot, I only wish it was a bit bigger. So, I decided to play around with it a bit, to see if there was anything I could do to make it larger, without compromising the strength of the box too much. I didn't add pictures of the box´ closing, when I posted pictures of it last time, but here are a couple of photos of how the handbag is closed. The extra lid on the underside of the decorative closing makes it a very sturdy box.
The box, open with the lid closed, and open with the lid open.
I found that if I didn't want to use a much bigger sized piece of card stock for the base, I only could increase the size of the bag by omitting the lid, and adding the length of that piece to the height of the box instead. I didn't, however, want to leave the front of the box completely unsupported, so I left a 1/4", that I could fold over, just to give it a tiny bit of extra strength.
Here is my solution. I have omitted the inside closing lid, to gain a little extra height. On this purple and on the pink one, I have used a small magnet for the closing mechanism, while on the others I have used a velcro dot, like you can see on the original box.
We are not talking about a huge difference in size, the smaller one being 2 3/4" high, and the bigger one
3 3/8", while they both are the same width, 4 3/4", and the same depth 1 1/2".
I loved making this box, which resulted in me making it in several colors. In this post I am actually showing it in reversed order, as I started out making the brown on, then the orange, the purple and then I made the pink last.
The brown, or chocolate bar colored one, is made with base papers from Lawn Fawn, and downloaded papers that I have purchased, for the decoration.
I haven't quite figured out what I will use the boxes for yet, they are a bit too small to put a pack of cards into, unless I make some cards that are a little smaller than regular sized cards, but I am sure I will think of something.
My attempt at making a tutorial to show you how to make these boxes.
On Friday, the 31st of July, Sam Calcott of Mixed Up Craft was going to do another Facebook Live. Unfortunately I didn't have the chance to watch, as I had a service appointment with my car that I had to go to. During that Live she made this beautiful card, a Building Block Card or a Block Card, if you like. Luckily for me though, she put up a YouTube tutorial on how to make the card really soon thereafter, as I didn't really feel like watching the live after the fact.
So yesterday I made this card, that I am really happy with! I absolutely adore the papers I have used. They are from the series "Little Fawn and Friends" from Craft Consortium. I decided to use Norwegian sentiments on the card, as I more often end up sending cards to Norwegian friends, as supposed to English speaking ones. The sentiments are all about having courage, and therefore I have simply called the card "Mot!", or "Courage!" in English. The sentiment says. "Courage to do what you dare not do."
This is a card that was a lot easier to make than I initially thought, much because of the great tutorial
I kept the theme of being courageous on the back of the card with another sentiment that says "What would life be if we didn't have the courage to try?"
My mom asked me the other day if I could make a birthday card for her. It was going to be for a toddler who turns two, and since I have wanted to try out making a shirt card for a while, I thought if I could find some fun papers, it could work as a card for a two-year old. I went into my downloadable papers and found this really adorable dinosaur patterned one. Since the card called for a double sided print, I choose the other pattern, the stars, as the backside of the dinosaurs.
I followed Mixed Up Crafts tutorial on how to make this card, and it turned out to be a very easy AND fun card to make!😃
I thought the inside of the card looked rather plain, so I fussy cut one of the dinosaurs, and stuck it on the inside.
In hindsight I thought I needed to show the age on the front of the shirt, so I die cut the number two, and stuck it on the shirt pocket.
I decided to make an envelope to match the card, so I stuck on a scrap piece of paper that was left over after making the card.
Mixed Up Crafts very easy to follow tutorial for this card.
Today's post is a card I made in a hurry, because I needed a water-themed card for a card challenge. Alas, I made all the rookie mistakes that I used to make when I first started out dabbling in card making. I had decided to make a shaker card, and it is not like I haven't made shaker cards before, but I still went about it in the wrong order of things. I should have made the card front more appealing than plain white, I should have made the shaker part thicker, so that the shaker elements moved more freely etc. I ended up with a lot of "should haves", however, I did have a card I could send in to the challenge in the end. And lo and behold, the card actually was drawn as the winner of the challenge, and I am a gift certificate richer than I was before I made the card!
I will however alter the card a little bit, put a sentiment on it or something like that. I might even redo the whole card, as I am NOT happy with it at all!