Wednesday, April 6, 2022

Double Z Fold Cards

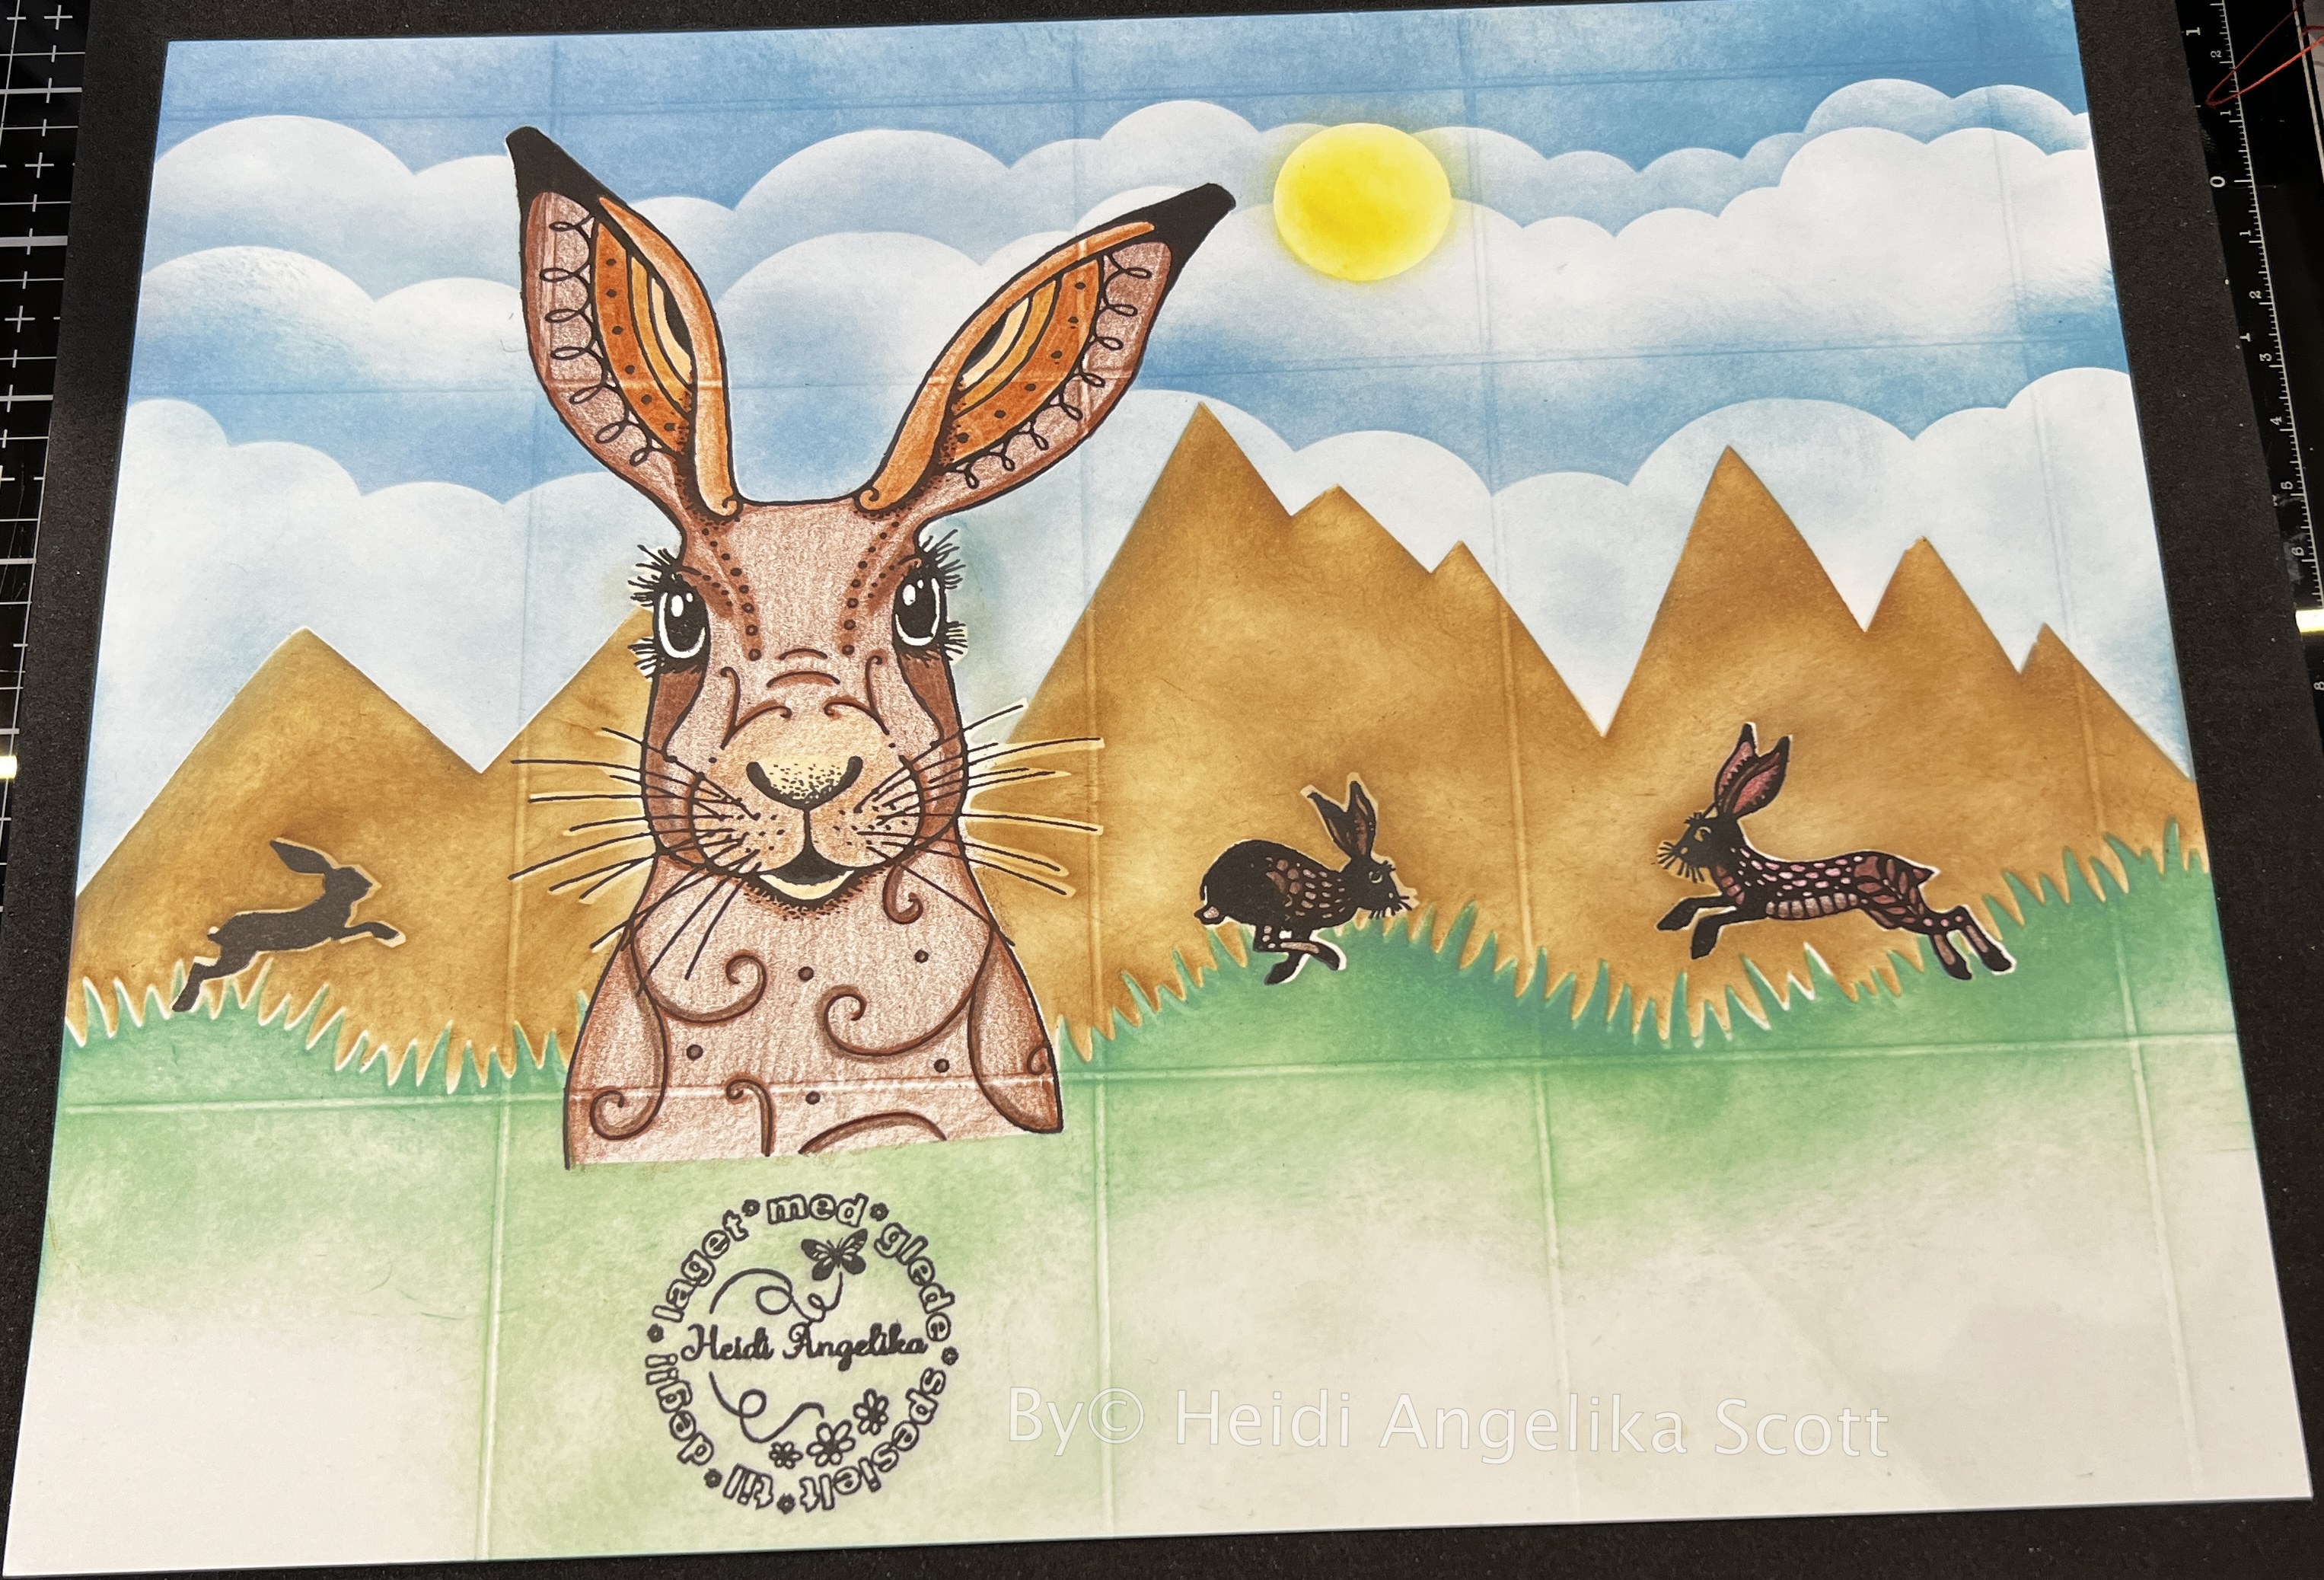
This post is showing a card that is really easy to make; the Z Fold card. The one that I have made here is a double Z Fold, which means there are two Z´s making the base of the card.
Another, and even easier way to make a Z Fold, is to just have one Z as the base of the card.
It is really up to you how intricate or simple you want your Z Card to be. It all comes down to how you choose to decorate it. Type in Z Fold Card over at YouTube and you will see plenty of great ideas and examples of what is possible to do. Here is a very short and simple tutorial of how to make the base for a Z Fold Card.

Tuesday, April 5, 2022

Milk Carton Gift Boxes

I had lots of fun this weekend making these two milk cartons! Planning the lay-out, stamping, masking, ink blending and coloring took quite a lot of time, but I enjoyed myself, which is what is important! And I actually love how they turned out☺️! Filled with chocolate, they will be a nice alternative to the more common candy-filled Easter Eggs.
There are tons of easy to adapt tutorials out there, and you can almost make it whatever size you want. I have made several Lidded Milk Cartons following one of The Paper Pixie´s easy to follow tutorials before. They are super cute, however, this time I wanted my cartons to be a little bigger, and I remembered that I had made one a while back, (you can see my blogpost about it here) crafting along with Sam Calcott on one of her Facebook lives. I used the same method of decorating on these two cartons, stamping an image, that I then masked, before ink blending my background. It is always so much fun to remove the masking and see the image pop out bright white amongst all the colors of the background! I then spent quite some time coloring in my main images.
For my backgrounds I used stencils from Lawn Fawn; the slimline cloudy stencils and the slimline grassy hillside stencils. I also drew and cut a mountain on a sheet of acetate, as I don´t have any mountain stencils.
Unfortunately I had forgotten that there was a small mistake in the live, when it comes to where to cut or not, so even though I love the results of my cartons, they were supposed to be whole/not cut at the top. Oh well, they work with the flaps, as well😃, and now I will most likely remember the next time I make one😉.
- Before cutting into the paper -
- After cutting -
- After gluing the sides together -
- Close up of the brown rabbit -
- The brown with the bottom folded and glued -
- Close up of the grey rabbit -
- The grey with the bottom folded and glued -

Sunday, April 3, 2022

Gift Card Tag Pocket

I love this little easy to make Tag Pocket! I first saw a picture of a similar one last weekend, at Bikubens Vårscrap, where it was one of the challenges offered. I have tweaked it a bit, as I prefer to work in inches, not centimeters, and I have made the tag into a gift card tag, instead of having it as a plain tag.
Here´s how to make it:
This is a quick template that shows the measurements. The left hand panel, as well as the right hand panel, are to be folded in over the middle panel, and unless the desired result is for it to be bulging, which you might want if your plan is to have a bulkily decorated tag, I would cut off about 1/8" on both sides. The 1/2" tab at the bottom is to be folded in under the side layers, to stop the tag from sliding through the pocket.
If you want to decorate the inside of the pocket, I would do that before glueing everything together. I just used the back side of the paper I wanted to decorate with, cut a piece measuring 3 3/8" x 5 7/8", that I glued on to the middle panel.
Once you have cut off the top corners and glued the side panels over the middle panel, you need to make a layer for the front of your pocket. I did that by cutting another piece of the same patterned paper, measuring 3 3/8" x 5 7/8", that I put inside the folded and glued pocket. I drew faint pencil marks along my "V" shaped cut-out, and then I cut about 1/8" further in on my paper. This will give you a slight border around the edges.
The tag is made form a base of 3 1/8" x 6 1/2" piece of card stock with a layer of patterned paper that is the exact same size. I measured 1 1/16" in, and 1" down on both sides at the top, made marks, and drew pencil lines and cut. I also punched a hole and inserted an eyelet at the top of my tag, through which I threaded a piece of ribbon.
As I said, I wanted this tag to have a pocket to hold a gift card. This was made by using a scrap piece of my patterned paper measuring 3 1/4" x 3", scored on the 3 1/4" side at 1/2" and 2 3/4", and at the 3" side at 1/2". I ended up cutting away some of that bottom 1/2", to get rid of some bulk. I also cut wedges off each of the folds at the bottom, before I burnished and glued it in place. You need to decide how high, or low, you want the insert for the gift card to be. You might want the recipient to see that there is a gift card in the Tag Pocket, or you might, like me, not want to give it away right away.
Then all that is left is to do is to decorate both the tag, if you want to, and more importantly the front of the Tag Pocket. I once again had a hard time settling on the final decoration, which has made me starting to take pictures of the options, that way I can go back between the alternatives and try to decide. You will see that the final card is actually the final decoration alternative.😂 That´s me for you.😃
- With no extra decoration -
- With a flower to the side of the sentiment -
- With the flower on the tag -
- With a metal butterfly on the tag holder -
I settled for the butterfly on the tag holder, and in addition I glued another butterfly on the tag itself, as well as a fussy cut , flower from the Maja Design paper that I had used, "Enjoying outdoors - Autumn picnic". I usually buy my Maja Design papers from Bikuben.

Thursday, March 31, 2022

Letter Gift Boxes

I first heard the idea of Letter Gift Boxes when I saw Mixed Up Craft´s tutorial on the letter "M". It was one of this years makes in Sam Calcott´s Mothers Day Series - "M" for Mother/Mothers Day. I thought it would be perfect as a little gift for my young nephew Mats André, filled with treats, of course. Therefore I decorated it with a theme I thought he would appreciate, papers from the Circus series from Craft Consortium. I also die cut a banner and letters to spell his name, which I glued to the front of the box. I then filled it with lots of different chocolate treats.🍫
The banner with his name.
The back side of the box.
A sideview showing the opening of the box.
When I had finished the "M" box, I felt like I was kind of on a roll, so I decided to try to make others. I initially wanted to make a "C" next, as one of my sisters names starts with a "C". I ended up struggling with that for quite a while, before I decided to put it aside and do a much easier letter first, namely "L". I thought that even someone as bad as I am in math, could figure out the measurements for an "L".😂 And I did, it wasn´t that hard at all. I wanted this to be a birthday card/gift to my brother-in-law, as his name starts with the letter "L". He loves his beer, so I decorated it with papers from Papirdesign, a series called "Mens vi venter" I used stamps from Papirdesign, and unbranded dies to make the decorations, and filled this with chocolates, as well. His birthday is coming up in April, so I haven´t given this to him yet, but I highly doubt that he ever visits my blog, so there is hardly any danger of him seeing it.
The open box.
I have not made any more Letter Gift Boxes yet, but as I suddenly remembered that I have a Brothers ScanNCut, making the actual letters is not a problem at all. It is the edges that links the front to the back of the box, that takes time to figure out. So as of now, I have both the letter "C" and the letter "G" lying around waiting to be turned into boxes. When that will happen, I don´t know...😂! Mixed Up Crafts tutorial for the letter "M".

Wednesday, March 30, 2022

Springscrap with Bikuben

During the weekend of March 25.-27th, it was time for Bikubens digital spring scrap meet, Vårscrap med Bikuben. Bikuben is a very well known hobby store, that a while back changed from being an actual store, to being solely a netshop. They have scrap meets twice a year, in the fall and in the spring, and this is the third year they are doing it, so it is becoming a welcomed tradition. I have never taken part before though, and I honestly did not know anything about what to expect! SO, I cleared my weekend and hunkered down in front of my Mac in my craft room, and was ready to do anything that was thrown at me!😂 I figured it was a good idea to print out the program, so that I could see black on white what the plans were. To my surprise there wouldn´t be back to back with demonstrations and live card making. I already knew that there would be one scheduled craft along, cause I had bought the kit to take part in that, however, other than that there were just three demos and a "show and tell" on the docket. As I said befroe, I had no idea what to expect, and I clearly expected something different than I got. What I got was really good, though, don´t get me wrong😉. There were 15 different challenges that could be entered, and you could in theory enter 5 different projects in each challenge. In addition there were so-called speed challenges and night challenges, so you could in fact craft 24/7 if you wanted to. You could also at your own cost, trade tags and ATCs (Artist Trading Cards). Being a big net store like Bikuben is, thay had accumulated a huge prize pot, and all three days they would draw prizes on your entry ticket. They did, of course, have prizes for every challenge as well. To decide who won, they used "Random", that way no one could claim that things were unfair. AND, last but not least, they had special sales in the store for the participants in the scrap meet.
I will list the differnet challenges, wether I had entries or not. I will show my entry in the categories I entered. I just want to say first, though, that those who know me, and how I craft, will already know that I struggled. I have a very hard time getting ideas that I like, and that I am comfortable with, and I wasted TONS of time just pondering on what to do next. So much so, that I wrote all 15 challenges down on little notes and drew them out of a cup, and that was just to know which challenge to pick. Getting ideas for what to make is a whole other matter🤪. So next time, I will have categories of styles to draw from as well!😃
Challenge 1: Creative with Stamps; use at least 3 stamps and make whatever you want.
Challenge 2: (Crafting)Straws; make whatever you like, but you have to incorporate straws in your project.
Challenge 3: Monochrome Cards;
Challenge 4: Confirmation; Norway has the main bulk of confirmations in April/May. Make a project that has the theme "Confirmation".
Challenge 5: Bingo (pick as if you were playing bingo)
My entry:
Challenge 6: (Use at least 3 of the colors.)
Challenge 7: "For the guys." My entry;
Challenge 8: Cheers!! My entry:
Challenge 9: Tag minialbum, minimum 6 tags (I started on this one, made the bases for 3x 8 tag albums, but had no idea how to decorate them, so now I am left wit a lot of tags for later.🤣)
Challenge 10: Happy Easter! My entry:
Challenge 11: Sketch (Use the same layout/placements, but use what ever theme you´d like)
Challenge 12: Pocket Card (following given instructions, make a card that looks like the one in the picture below)
Challenge 13: Mixed Media
Challenge 14: Stars (use minimum 3 stars in your project) My entry:
Challenge 15: Vintage (I made a tag for this challenge, and started making a matching card, however, I didn´t "feel" it, so I didn´t enter either....😊, in other words; I wasted a lot of time I could have spent on actual entries😳)
Thrown in at set times through out the day there were speed challenges. On Friday the speed challenge was called "Clean and simple", my entry (which was lucky enough to be picked as challenge winner🎉):
On Friday, the night challenge was called "Inspirational picture". On Saturday the anouncement of the challenge was delayed, and I missed it completely, but I saw later that it had been called: Butterflies or other birds. Saturday night´s challenge was called "Signs of spring", which I entered with this rocker card:
Then finally, Sunday´s speed challenge was to make "Playing Card Art". This I hadn´t even heard of before, so I was curious as to try it out. Here is my entry:
If all these challenges weren´t enough, there were challenges in connection to the scrap along, and the other demos as well. I made a card for the scrap along, a shabbychic card with lots of flowers and other decorations. My entry:
All in all it was a great and very creative weekend. Although exhausting and hard on my bank account, it is definitely something I want to do again. The dates for this fall´s scrapmeet is already out, so hopefully I will be able to set aside the weekend of September 16.-18th!

Easy Fold-Over Cards

Lately I have been hooked on making a simple fold-over card, that you can easily make into a gift card/tag-pocket card. Once again...