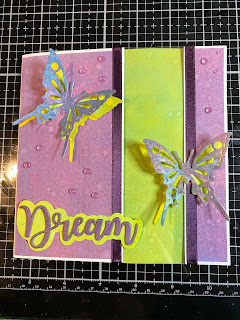
I decided to try out a technique I have not tried before after I had seen one of my favorite youtube card maker, Natasha Foote, making a card using acetate as part of the card. Instead of creating an acetate window like she did, I decided to substitute part of my card with acetate. Therefore I decided how much of the card I wanted to be see through, before I measured and cut the front panel of a 6"x6" card. Then I cut a piece of acetate that was just a little bit bigger than the piece that I had cut out of the card front and used 1/4" double sided adhesive to glue it in place.
In order to be able to write inside the card without having the writing showing through the acetate, I glued another 6"x 6" card with the opening turning the wrong way, on the back of the first card. The result was a long card that could be folded into a 6"x 6" card.
I blended some Worn Lipstick, Seedless Preserves and Dusty Concord Distressed Oxide Inks and sprayed it with some Grape Fizz Perfect Pearl water mixture, heat set it before I cut out pieces about 1/8" smaller than the 2 card front panels. I adhered both with double sided adhesive. Then I cut two pieces of matching dark purple ribbon so that it was long enough to wrap all the way around, covering up the place where the acetate was attached on the back of the card front. The ribbon is also held in place with strips of 1/4" double sided adhesive.
The next thing I did was to mask off most of the inside of the card so that I could blend some Cracked Pistachio and Mustard Seed Distressed Oxide Ink on the part of the card that can be seen through the acetate. This was then spritzed with Perfect Gold Perfect Pearl mist to create the oxidized effect.
I chose the colors for this card based on the butterflies on the front. They are die cut from some scrap paper I had practiced my ink blending on a while back. At first I kept the shadow of the butterfly white, but then I decided that it would look better if I ink blended them to mach the inside stipe of the card.
I die cut the word Dream three times and layered them with a piece from a scrap piece of the purple front panel on the top, and blended some more cracked pistachio and mustard seed distressed oxide for the shadow behind the word. I then traced around the sides of the word with a matching metallic purple marker. Unfortunately I was a little sloppy, had a little accident and got some stripes on the purple front of the word, and decided to color the whole word with the metallic marker.
Next I glued the butterflies and Dream on to the front of the card. I finished the card off with some light purple diamonds form Little Things from Lucy's Cards.
The card measures 6" x 18" when it is opened up all the way.


